
Stepped Demonstrations - Church Rock, Broadhaven
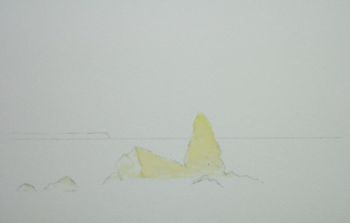
1.
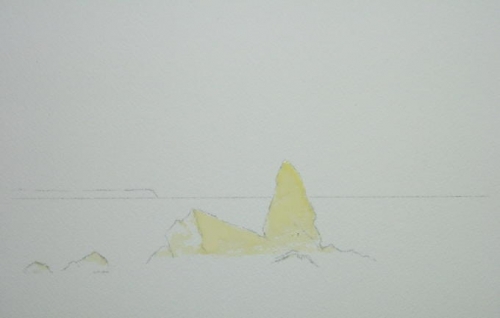
1. Arches 300gsm NOT surface cotton rag paper soaked for 30 minutes, stapled to a Sundeala (school notice board material) board at 2” intervals and left to dry. This way the paper is stretched far tighter than using brown paper tape and works 100% of the time.
2. Image drawn out using HB clutch pencil and the light faces of the rocks masked out using Winsor & Newton clear masking fluid applied with a clean dry brush (or a pastel shaping tool) to dry paper. (unlike with some other cheaper papers, I have never experienced any problems using Arches paper).
2
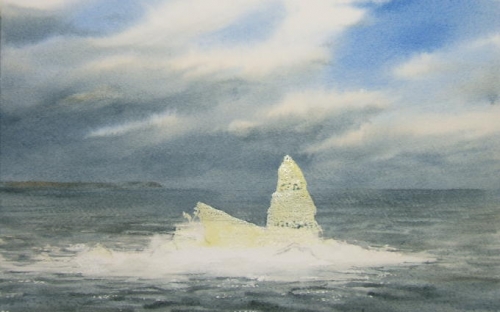
1. Wet the paper with clean water using a soft brush. (I use a 3” hake)
2. Using the stiff wash of cobalt blue, paint the gaps between the clouds. Allow the colour to be stronger at the top, getting weaker towards the horizon.
3. Using the stiff wash of cobalt and burnt sienna paint in the shadow areas underneath the white clouds. The clouds appear to become narrower the closer to the horizon.
4. Wash out a small hake brush and squeeze until almost dry. Using a scumbling motion, soften any hard edges which may have developed in the middle of each cloud. This should give them a rounded, three dimensional appearance.
5. Allow the paper to dry before painting in the distant cliff with an almost dry brush
sparsely loaded with a mixture of burnt sienna and a little cobalt blue. If the brush is wet the resulting hard edge will destroy any depth in the painting. Treat the horizon in the same way (cobalt blue and a little burnt sienna) varying the intensity of the edge. Bring the colour right down to the bottom leaving the foam area clear, and just before drying, stroke in some suggestions of waves with a dry brush softening the bottom of each one.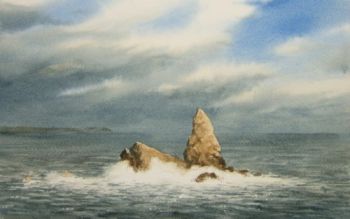
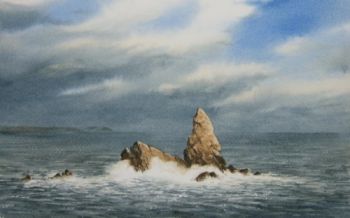
3
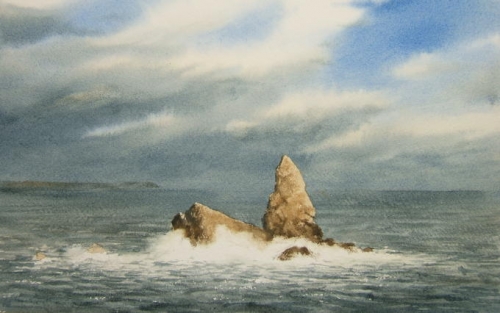
1. When completely dry, rub off all masking fluid and paint all the areas of rock with a thin wash of burnt sienna avoiding the areas of foam. When dry, add a little cobalt to the wash and scumble, with a dry brush, over the rocks leaving some of the lighter wash uncovered. (No point in applying a light wash only to thoroughly obliterate it with successive applications!)
2. Add a series of scumbles of progressively darker mixes to produce the correct texture and a dark shadow area. With the background sea and sky a mid-tone and the rocks having a darker and a lighter side, a three dimensional effect should result.
4
1.Using both a No. 4 round brush and a size 0 rigger add detail to the rock to enhance the rugged texture and fracture lines.
2. Using a damp brush (I like the Winsor & Newton ‘University Series’ flats for this purpose), soften some of the foam edges both where they meet the rock and the relatively calm water below. Too many hard edges and a ‘static look’ will be produced.
3. Add more definition to the waves by applying strokes just slightly off the horizontal – both ways- taking care to soften the lower part of each wave allowing it to merge with the water below. Try leaving a stroke with two hard edges and I think you’ll see what I mean.
4. The waves in the front should be slightly larger than those behind.
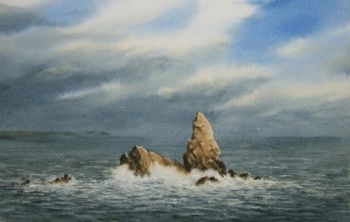
5
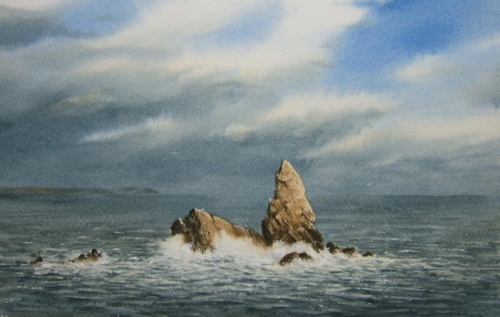
1. Now we’re at the stage for dotting i’s and crossing t’s. Here I find it a good idea to leave the work and make a cup of tea.
2. On returning and looking at things with ‘fresh eyes’, slight additions which the painting needs may spring to mind. Here I enhanced the splash area and a few wavecrests with dots and dabs of white gouache, and also intensified some of the dark shadows in the rocks.
3. Adding ‘bits and pieces’ in the final stages of a painting often adds considerably to the overall effect and is not to be confused with fiddling (that somewhat overused cliché). If it what the painting requires then do it. Fiddling is only what happens when the brush is in gear and the brain in neutral!

 |
|  |
| 
Copyright © Graham H Hadlow Watercolours. All rights reserved.