
Stepped Demonstrations - Porthclais Harbour, Pembrokeshire

1.
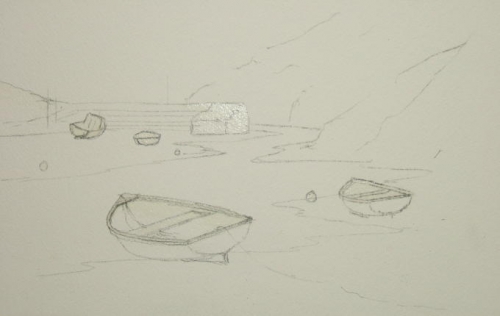
1. Draw out image on a piece of cartridge paper 10”x61/2” – with all the corrected mistakes and positional adjustments that goes with the process. Were this carried out directly on watercolour paper the surface could be adversely affected. Preparing this cartridge paper as a stencil, rub the reverse side with a soft carbon pencil in the way we used to do in school with tracing paper.
2. Secure this, with 4 small pieces of masking tape, over a sheet of Arches (by preference) 140lb NOT stretched paper and lightly go over the image lines with a thin ball point pen. This renders the image on to the paper without any need for correction. I often employ this method for scenes involving complex detail. An added bonus is that if we make a hash of the painting the stencil can be used again thereby preserving our temper and sanity.
3. Using Winsor & Newton clear masking fluid and a fine pastel shaper, mask out the top edges of the boats and the top and right hand side of the harbour wall.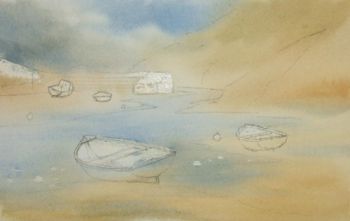
2.
1. Main colours are cobalt blue, raw sienna, & burnt sienna – Winsor & Newton Cotman Series.
2. Wet the paper and, with a size 10 round, brush in some cobalt blue in the sky area and also over the water in the harbour. With a mixture of cobalt blue and burnt sienna, paint the shadow area of the cloud to the top left, leaving a white edge. Cover the cliff, harbour wall and sand areas, with burnt and raw sienna, slightly darker in the vertical places than the horizontal. Try to do everything whilst the surface is still damp. Leave to dry.
3.
1. Using a mixture of cobalt blue and raw sienna, add a green tinge to the slopes above the harbour. Leave to dry before painting in the steep edges in burnt sienna and cobalt blue. Do this with a moist rather than wet brush allowing each application to dry before overlaying a darker one. Always allow some of the underwash to show through to give variation. A scumbling action will give edges and faces that rugged, sea carved appearance. With a very dark mix emphasise the shadows and crevices.
2. Paint in the ripples on the water in cobalt blue with a little added burnt sienna using a size 6 round brush. The further ripples are both thinner and shorter that the ones close to.
3. Pick out a few reflections below the rocks and harbour wall with dry, soft edged horizontal strokes.

4.
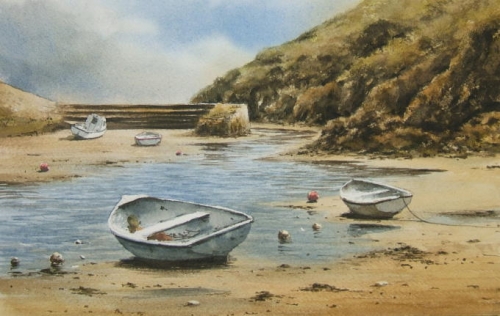
1. Remove all masking fluid when the paper is dry.
2. To make the boats look three-dimensional we need to consider the light source, in the painting, which is from the right and slightly to the front. Using a shadow colour - cobalt blue and burnt sienna mixture - paint in the shadow areas on both the in and out sides of the boats, softening hard edges to show the curvatures. When dry, emphasise areas of darker shadows with stronger colour.
3. Paint in the mooring buoys and ropes, odds and ends in the boat and also the lines underneath the boat gunnels to give a ‘finished’ look.
4. Reinforce the shadows under the boats.
5. Go and make a cup of tea.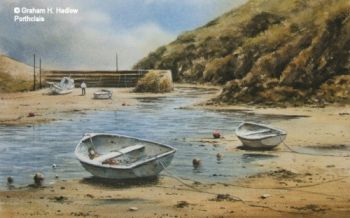
5.
1. This is the dotting i’s and crossing t’s stage and it is often best to have taken a little break before returning with ‘fresh eyes’. Things that were previously rather puzzling can now seem straight-forward.
2. Add a figure in the background to give a sense of life and scale and also a few darker ripples to the water.
3. Enrich the sand in the foreground with burnt and raw sienna using a dry brush technique and suggest some weed and pebbles with a No.1 rigger.
4. Add any ‘bits and pieces’ which you think will contribute to the overall effect. This is NOT fiddling. Fiddling happens only when the brush is in gear and the brain in neutral!


 |
|  |
| 
Copyright © Graham H Hadlow Watercolours. All rights reserved.